
HowToTranslateAnApp
How to translate an app
Section titled “How to translate an app”To show how we can use I18n in our Open Pioneer Trails apps, we will extend the empty app (at src/apps/empty).
By default, the empty app is prepared to support I18n with locale en.
We will add support for another language (locale de) and demonstrate advanced features of FormatJS (opens in a new tab) Intl.
Note
For more details to I18n file format please check I18nFormat.
Preparing i18n support for our app
Section titled “Preparing i18n support for our app”To begin, start the development server
pnpm run devand open the empty app (opens in a new tab)
Open the build.config.mjs and add locale de to the i18n property:
import { defineBuildConfig } from "@open-pioneer/build-support";
export default defineBuildConfig({ i18n: ["de", "en"]});We will see an error message in browser, because of the missing yaml file for our new locale.
We need to create the file in the i18n folder. The naming schema of the file is {locale}.yaml.
messages: heading: "I18n HowTo" text: "Wie lässt sich I18n in Open Pioneer Trails Apps nutzen?"By default, the app uses the browser settings or system default for determining the locale.
If your browser locale is set to de you should see the values from de.yaml (maybe you will need to restart the dev server).
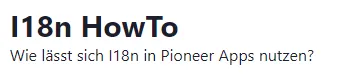
To demonstrate the multi-language support and force a language of our choice, we need to modify the app.ts:
import { createCustomElement } from "@open-pioneer/runtime";import * as appMetadata from "open-pioneer:app";import { AppUI } from "./AppUI";
// Reads the 'lang' parameter from the URL and, if set, uses it// for the application's locale.// This can be helpful during development, but it is entirely optional.const URL_PARAMS = new URLSearchParams(window.location.search);const FORCED_LANG = URL_PARAMS.get("lang") || undefined;
const Element = createCustomElement({ component: AppUI, appMetadata, config: { // Forces the locale if set to a string. // 'undefined' choses an automatic locale based on the app and // the user's preferred languages. locale: FORCED_LANG }});customElements.define("empty-app", Element);Now we are able to force the locale with lang parameter:
http://localhost:5173/sites/empty/?lang=de (opens in a new tab) or http://localhost:5173/sites/empty/?lang=en (opens in a new tab)
Note The integration of I18n works the same way for Trails packages. We have to add the
i18nconfiguration inbuild.config.mjsand matching yaml files for each language in thei18nfolder. For each app/language combination, the build tool collects the YAML files of the app and the used packages and merges them into a flattened JSON structure. As mentioned in I18nFormat we can override yaml entries from packages in our app yaml. Please check thei18n-sample(opens in a new tab) app as a practical example for this topic.
Using advanced features of FormatJS Intl
Section titled “Using advanced features of FormatJS Intl”In a first step we prepare our AppUI:
export function AppUI() { const intl = useIntl(); return ( <Container> <Heading as="h1" size="lg"> {intl.formatMessage({ id: "heading" })} </Heading> <Text>{intl.formatMessage({ id: "text" })}</Text> <ExampleStack></ExampleStack> </Container> );}We initialize the intl object with the useIntl hook. Now we can use intl.formatMessage with our flattened keys from the yaml files to add our translated text to the app.
In addition, we define the ExampleStack as a container for our advanced examples.
Interpolation
Section titled “Interpolation”First we generate an entry in our ExampleStack for our InterpolationExample:
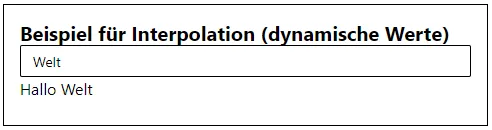
function ExampleStack() { return ( <Stack mb={5} mt={5} gap="24px" align="stretch"> <StackSeparator borderColor="gray.200" /> <Box bg="white" w="100%" p={4} color="black" borderWidth="1px" borderColor="black"> <InterpolationExample></InterpolationExample> </Box> </Stack> );}Interpolation allows replacement with dynamic values. That’s why we use a text input field in our interpolation example:
function InterpolationExample() { const intl = useIntl(); const [value, setValue] = useState(""); return ( <> <Heading as="h4" size="md"> {intl.formatMessage({ id: "interpolation.heading" })} </Heading> <Input value={value} onChange={(evt) => setValue(evt.target.value)} placeholder={intl.formatMessage({ id: "interpolation.placeholder" })} size="sm" /> <Text mb="8px"> {intl.formatMessage({ id: "interpolation.value" }, { name: value })} </Text> </> );}As we can see, the bound input value value is passed to the intl.formatMessage function with the parameter name name.
Add the keys and values to the yaml configuration:
messages: #.... interpolation: heading: "Beispiel für Interpolation (dynamische Werte)" value: "Hallo {name}" placeholder: "Geben Sie Ihren Namen ein..."#....Add the defined keys to all yaml files.
The interpolation.value key uses a placeholder for name.
In the rendered text the passed value of name will replace the placeholder.
Plurals
Section titled “Plurals”We generate another entry in our ExampleStack for our PluralsExample:
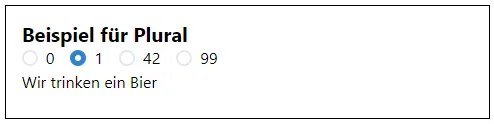
function ExampleStack() { return ( <Stack mb={5} mt={5} separator={<StackSeparator borderColor="gray.200" />} gap="24px" align="stretch" > <Box bg="white" w="100%" p={4} color="black" borderWidth="1px" borderColor="black"> <InterpolationExample></InterpolationExample> </Box> <Box bg="white" w="100%" p={4} color="black" borderWidth="1px" borderColor="black"> <PluralsExample></PluralsExample> </Box> </Stack> );}With plural support we can output different text depending on a count value (see Link (opens in a new tab)). We will use a RadioGroup to change the count value in our example:
function PluralsExample() { const intl = useIntl(); const [value, setValue] = useState<string | null>("1"); return ( <> <Heading as="h4" size="md"> {intl.formatMessage({ id: "plurals.heading" })} </Heading> {/*import { Radio, RadioGroup } from "@open-pioneer/chakra-snippets/radio";*/} <RadioGroup onValueChange={(e) => setValue(e.value)} value={value}> <Stack gap={4} direction="row"> <Radio value="0">0</Radio> <Radio value="1">1</Radio> <Radio value="42">42</Radio> <Radio value="99">99</Radio> </Stack> </RadioGroup> <Text mb="8px">{intl.formatMessage({ id: "plurals.value" }, { n: value })}</Text> </> );}The bound value value is passed to the intl.formatMessage function with the parameter name n. Here is the yaml configuration:
messages: #.... plurals: heading: "Beispiel für Plural" value: "Wir trinken {n, plural, =0 {kein Bier} one {ein Bier} other {# Biere} =99 {zu viel Bier}}"#....Add the defined keys to all yaml files.
The plurals.value key defines a count parameter n. In result the passed value of n will be used to generate the matching output.
Selection
Section titled “Selection”Let’s add an entry for SelectionExample in our ExampleStack:
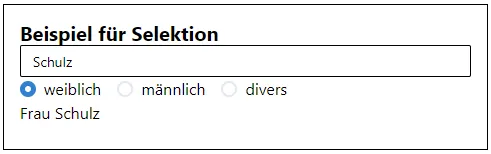
function ExampleStack() { return ( <Stack mb={5} mt={5} separator={<StackSeparator borderColor="gray.200" />} gap="24px" align="stretch" > <Box bg="white" w="100%" p={4} color="black" borderWidth="1px" borderColor="black"> <InterpolationExample></InterpolationExample> </Box> <Box bg="white" w="100%" p={4} color="black" borderWidth="1px" borderColor="black"> <PluralsExample></PluralsExample> </Box> <Box bg="white" w="100%" p={4} color="black" borderWidth="1px" borderColor="black"> <SelectionExample></SelectionExample> </Box> </Stack> );}With selection support we can output different text depending on a set of given values (see Link (opens in a new tab)). In our example we will change the title depending on a gender selection. We will use a text input for name and a RadioGroup for gender selection:
function SelectionExample() { const intl = useIntl(); const [value1, setValue1] = useState(""); const [value2, setValue2] = useState<string | null>("male"); return ( <> <Heading as="h4" size="md"> {intl.formatMessage({ id: "selection.heading" })} </Heading> <Input value={value1} onChange={(evt) => setValue1(evt.target.value)} placeholder={intl.formatMessage({ id: "interpolation.placeholder" })} size="sm" /> <RadioGroup onValueChange={(e) => setValue2(e.value)} value={value2}> <Stack gap={4} direction="row"> <Radio value="female"> {intl.formatMessage({ id: "selection.gender.female" })} </Radio> <Radio value="male"> {intl.formatMessage({ id: "selection.gender.male" })} </Radio> <Radio value="other"> {intl.formatMessage({ id: "selection.gender.other" })} </Radio> </Stack> </RadioGroup> <Text mb="8px"> {intl.formatMessage({ id: "selection.value" }, { name: value1, gender: value2 })} </Text> </> );}We pass the name (value1) and gender (value2) to the intl.formatMessage.
Here is the yaml configuration:
messages: #.... selection: heading: "Beispiel für Selektion" value: "{gender, select, male {Herr} female {Frau} other {}} {name}" gender: male: "männlich" female: "weiblich" other: "divers"#....Add the defined keys to all yaml files.
The selection.value key defines a parameter gender for selection and uses the dynamic parameter name.
In a selection we always have to define the other parameter.
It is used if the given parameter value does not match one of the other values (e.g. male or female).
In result the passed value of gender and name will be used to generate the matching output.
Number Format
Section titled “Number Format”Now we add an entry for NumberFormatExample to our ExampleStack :
function ExampleStack() { return ( <Stack mb={5} mt={5} separator={<StackSeparator borderColor="gray.200" />} gap="24px" align="stretch" > <Box bg="white" w="100%" p={4} color="black" borderWidth="1px" borderColor="black"> <InterpolationExample></InterpolationExample> </Box> <Box bg="white" w="100%" p={4} color="black" borderWidth="1px" borderColor="black"> <PluralsExample></PluralsExample> </Box> <Box bg="white" w="100%" p={4} color="black" borderWidth="1px" borderColor="black"> <SelectionExample></SelectionExample> </Box> <Box bg="white" w="100%" p={4} color="black" borderWidth="1px" borderColor="black"> <NumberFormatExample></NumberFormatExample> </Box> </Stack> );}With formatNumber we can not only format numbers locale specific, but also use units and currencies (see Link (opens in a new tab)).
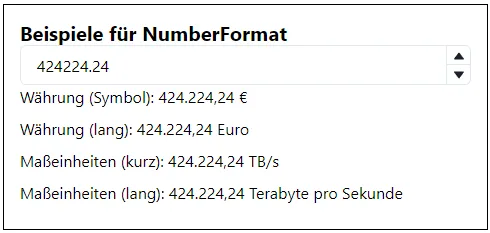
In our example we will have a number input and an output with different forms of unit and currency:
function NumberFormatExample() { const intl = useIntl(); const [value, setValue] = useState("424224.24"); return ( <> <Heading as="h4" size="md"> {intl.formatMessage({ id: "numberformat.heading" })} </Heading> {/*import { NumberInputField, NumberInputRoot } from "@open-pioneer/chakra-snippets/number-input";*/} <NumberInputRoot onValueChange={(valueChangeDetails) => { setValue(valueChangeDetails.value); }} value={value} step={0.25} formatOptions={{ minimumFractionDigits: 2, maximumFractionDigits: 2, useGrouping: false }} > <NumberInputField /> </NumberInputRoot> <Text mb="8px"> {intl.formatMessage({ id: "numberformat.example.currency1" })} {intl.formatNumber(+value, { style: "currency", currency: "EUR" })} </Text> <Text mb="8px"> {intl.formatMessage({ id: "numberformat.example.currency2" })} {intl.formatNumber(+value, { style: "currency", currency: "EUR", currencyDisplay: "name" })} </Text> <Text mb="8px"> {intl.formatMessage({ id: "numberformat.example.unit1" })} {intl.formatNumber(+value, { style: "unit", unit: "terabyte-per-second" })} </Text> <Text mb="8px"> {intl.formatMessage({ id: "numberformat.example.unit2" })} {intl.formatNumber(+value, { style: "unit", unit: "terabyte-per-second", unitDisplay: "long" })} </Text> </> );}Here is the yaml configuration:
messages: #.... numberformat: heading: "Beispiele für NumberFormat" example: currency1: "Währung (Symbol): " currency2: "Währung (lang): " unit1: "Maßeinheiten (kurz): " unit2: "Maßeinheiten (lang): "#....Add the defined keys to all yaml files.
We pass the value with different NumberFormatOptions to intl.formatNumber. In result, we see our formatted numbers.
Date/Time Format and Relative Time Format
Section titled “Date/Time Format and Relative Time Format”Finally, we add an entry for the DateTimeFormatExample to our ExampleStack :
function ExampleStack() { return ( <Stack mb={5} mt={5} separator={<StackSeparator borderColor="gray.200" />} gap="24px" align="stretch" > <Box bg="white" w="100%" p={4} color="black" borderWidth="1px" borderColor="black"> <InterpolationExample></InterpolationExample> </Box> <Box bg="white" w="100%" p={4} color="black" borderWidth="1px" borderColor="black"> <PluralsExample></PluralsExample> </Box> <Box bg="white" w="100%" p={4} color="black" borderWidth="1px" borderColor="black"> <SelectionExample></SelectionExample> </Box> <Box bg="white" w="100%" p={4} color="black" borderWidth="1px" borderColor="black"> <NumberFormatExample></NumberFormatExample> </Box> <Box bg="white" w="100%" p={4} color="black" borderWidth="1px" borderColor="black"> <DateTimeFormatExample></DateTimeFormatExample> </Box> </Stack> );}In our example we will have a date time input:
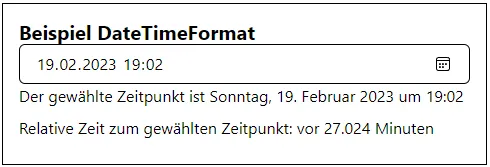
function DateTimeFormatExample() { const intl = useIntl(); const [value, setValue] = useState("2023-02-19T19:02"); return ( <> <Heading as="h4" size="md"> {intl.formatMessage({ id: "datetimeformat.heading" })} </Heading> <Input value={value} onChange={(evt) => setValue(evt.target.value)} size="md" type="datetime-local" /> <Text mb="8px"> {intl.formatMessage({ id: "datetimeformat.timelabel" })} {intl.formatDate(value, { dateStyle: "full", timeStyle: "short" })} </Text> <Text mb="8px"> {intl.formatMessage({ id: "datetimeformat.relativetimelabel" })} {intl.formatRelativeTime(getDeltaTime(value), "minute", { numeric: "auto", style: "long" })} </Text> </> );}To calculate the delta for our relative time output we define the function getDeltaTime:
function getDeltaTime(datetime: string): number { const delta = new Date(datetime).getTime() - new Date().getTime(); return Math.round(delta / 60000);}Here is the yaml configuration:
messages: #.... datetimeformat: heading: "Beispiel DateTimeFormat" timelabel: "Der gewählte Zeitpunkt ist " relativetimelabel: "Relative Zeit zum gewählten Zeitpunkt: "#....Add the defined keys to all yaml files.
We pass the value with DateTimeFormatOptions to intl.formatDate (see Link (opens in a new tab))
and with RelativeTimeFormatOptions to intl.formatRelativeTime (see Link (opens in a new tab))
In result, we see our selected formatted datetime and the relative time between now and the selected datetime.
Note
The used datetime input does not support a forced locale. It always uses the defined browser locale or the system default. In our example, if your browser uses localedebut your app uses url parameterlang=enthe input will show values matching to localede.
Formatting rich text
Section titled “Formatting rich text”So far, we have used the intl.formatMessage method to format strings.
Using this function, primitive values (such as strings, numbers, etc.) can be used as values in placeholders such as {name}.
For rich user interfaces, this way of rendering messages can be limiting in practice.
To render rich text with React components for your user interface, use intl.formatRichMessage() instead.
This functions follows the same principles as intl.formatMessage(), but is different in a few key ways:
- It always returns a React node. This makes it very powerful, but this also means that it can only be used in combination with React components.
- It supports React nodes as values. You can still use placeholders in your messages (like
{name}) but you can substitute arbitrary React nodes instead of only primitive values. - It supports defining custom tags in terms of React nodes, using functions as values.
- It provides a few basic formatting tags out of the box.
Examples:
Our messages look similar to the earlier examples:
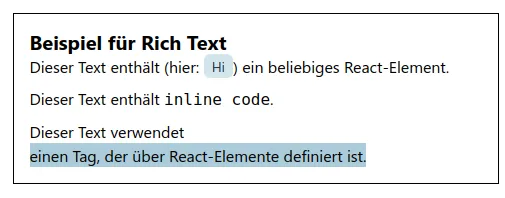
messages: # ... richtext: heading: "Beispiel für Rich Text" messageWithReactNode: "Dieser Text enthält (hier: {element}) ein beliebiges React-Element." messageWithInlineCode: "Dieser Text enthält <code>inline code</code>." messageWithReactTag: "Dieser Text verwendet <customTag>einen Tag, der über React-Elemente definiert ist.</customTag>"It is the rendering part that differs:
function RichTextExample() { const intl = useIntl();
return ( <> <Heading as="h4" size="md"> {intl.formatMessage({ id: "richtext.heading" })} </Heading> <VStack gap={2} align="start"> <Box> {intl.formatRichMessage( { id: "richtext.messageWithReactNode" }, { element: ( <Tag.Root> <Tag.Label>Hi</Tag.Label> </Tag.Root> ) } )} </Box> <Box> {intl.formatRichMessage({ id: "richtext.messageWithInlineCode" })} </Box> <Box> {intl.formatRichMessage( { id: "richtext.messageWithReactTag" }, { customTag: (parts) => ( <Box display="inline-block" background="trails.200" px={1}> {parts} </Box> ) } )} </Box> </VStack> </> );}The code above is rendered like this:
Using i18n in a service
Section titled “Using i18n in a service”The intl object is not only available in React components, it can also be used from any service.
The GreetingService in the following example uses the serviceOptions parameter (provided by the framework) to access the package’s intl object via currentIntl.
This object can be used in the same way as the intl object returned by useIntl:
import { type DECLARE_SERVICE_INTERFACE, ServiceOptions, PackageIntl } from "@open-pioneer/runtime";
export class GreetingService { declare [DECLARE_SERVICE_INTERFACE]: "i18n-howto-app.GreetingService";
private readonly _intl: ReadonlyReactive<PackageIntl>;
constructor(serviceOptions: ServiceOptions) { this._intl = serviceOptions.currentIntl; }
// (1) greet(name: string): string { return this._intl.value.formatMessage({ id: "greetingService.greeting" }, { name }); }}Our goal is to implement a UI component that calls the greet() (see (1)) method from above.
To make the service usable from the UI, we have to perform some necessary plumbing:
export { GreetingService } from "./GreetingService";import { defineBuildConfig } from "@open-pioneer/build-support";
export default defineBuildConfig({ i18n: ["de", "en"], services: { GreetingService: { provides: ["i18n-howto-app.GreetingService"] } }, ui: { references: ["i18n-howto-app.GreetingService"] }});Here is the yaml configuration:
messages: #.... serviceI18n: heading: "Beispiel für Service I18n" placeholder: "Namen eintragen" showGreeting: "Nachricht anzeigen" serviceResponse: "Nachricht: " greetingService: greeting: Hallo {name}!#....The ServiceI18nExample component displays a plain and simple react form using the intl API you have already seen.
In addition to using i18n from within the React component, it also interacts with a service (GreetingService, (1) in the example below) to show a translated message.
The form simply asks the user for a name and then calls the greetingService.greet(name) method (see (2) below) to show a greeting:
function ServiceI18nExample() { const intl = useIntl(); const greetingService = useService<GreetingService>("i18n-howto-app.GreetingService"); const [inputValue, setInputValue] = useState(""); const [greeting, setGreeting] = useState(""); return ( <> <Heading as="h4" size="md"> {intl.formatMessage({ id: "serviceI18n.heading" })} </Heading> <HStack as="form" onSubmit={(e) => { e.preventDefault();
const name = inputValue.trim(); if (name) { setGreeting(greetingService.greet(name)); } else { setGreeting(""); } }} > <Input placeholder={intl.formatMessage({ id: "serviceI18n.placeholder" })} value={inputValue} onChange={(evt) => setInputValue(evt.target.value)} size="md" /> <Button type="submit" flexShrink={0}> {intl.formatMessage({ id: "serviceI18n.showGreeting" })} </Button> </HStack> {greeting && ( <Text> {intl.formatMessage({ id: "serviceI18n.serviceResponse" })} {greeting} </Text> )} </> );}Demo App
Section titled “Demo App”The complete app i18n-howto can be found in the samples folder.
Changing the application’s locale
Section titled “Changing the application’s locale”It is possible to change the application’s locale to a specific locale using the setLocale method on the ApplicationContext.
Example:
import { ApplicationContext } from "@open-pioneer/runtime";
const appCtx: ApplicationContext = ...; // injectedappCtx.setLocale("en-US");Limitation: Currently, this requires a full restart of the application. Please create an issue or PR if you need support for changing the locale without restart.
For more information refer to the API of the core-packages runtime package.
Further reading
Section titled “Further reading”- FormatJS Documentation (opens in a new tab)
- Message syntax (opens in a new tab)
- Intl Reference (opens in a new tab) (interface
IntlFormatters)